Help in Disk Management
Disk Management in Windows helps you perform advanced storage tasks like initializing a new drive and extending or shrinking volumes. Here’s some info on things you can do using Disk Management:
Initialize new disks. If you add a brand new disk to your PC and it doesn’t show up in File Explorer, you might need to add a drive letter, or initialize it before using it. You can only initialize a drive that’s not yet formatted. Initializing a disk erases everything on it and prepares it for use by Windows, after which you can format it and then store files on it.
Warning: If your disk already has files on it that you care about, don’t initialize it – you’ll lose all the files. Instead we recommend troubleshooting the disk to see if you can read the files – see A disk’s status is Not Initialized or the disk is missing entirely.
To initialize new disks
Here’s how to initialize a new disk using Disk Management. If you prefer using PowerShell, use the initialize-disk cmdlet instead.
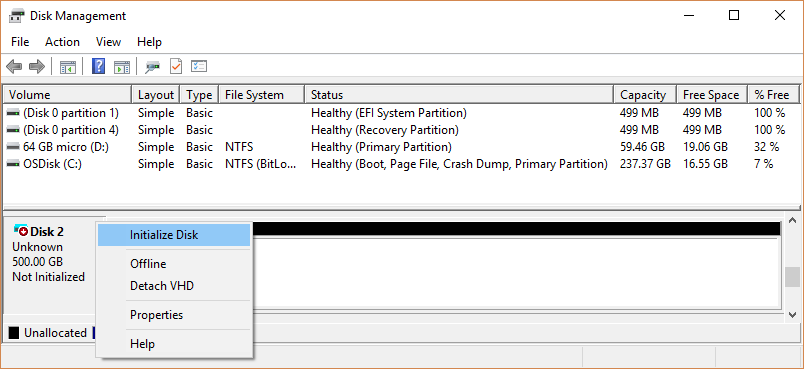
In Disk Management, right-click the disk you want to initialize, and then click Initialize Disk (shown here). If the disk is listed as Offline, first right-click it and select Online.
In the Initialize Disk dialog box (shown here), check to make sure that the correct disk is selected and then click OK to accept the default partition style. If you need to change the partition style (GPT or MBR) see About partition style – GPT and MBR.
The disk status briefly changes to Initializing and then to the Online status. If initializing fails for some reason, see A disk’s status is Not Initialized or the disk is missing entirely.
About partition styles – GPT and MBR
Disks can be divided up into multiple chunks called partitions. Each partition – even if you have only one – has to have a partition style – GPT or MBR. Windows uses the partition style to understand how to access the data on the disk.
As fascinating as this probably isn’t, the bottom line is that these days, you don’t usually have to worry about partition style – Windows automatically uses the appropriate disk type.
Most PCs use the GUID Partition Table (GPT) disk type for hard drives and SSDs. GPT is more robust and allows for volumes bigger than 2 TB. The older Master Boot Record (MBR) disk type is used by 32-bit PCs, older PCs, and removable drives such as memory cards.
To convert a disk from MBR to GPT or vice versa, you first have to delete all volumes from the disk, erasing everything on the disk. For more info, see Convert an MBR disk into a GPT disk, or Convert a GPT disk into an MBR disk.
Extend a basic volume
You can add more space to existing primary partitions and logical drives by extending them into adjacent unallocated space on the same disk. To extend a basic volume, it must be raw (not formatted with a file system) or formatted with the NTFS file system. You can extend a logical drive within contiguous free space in the extended partition that contains it. If you extend a logical drive beyond the free space available in the extended partition, the extended partition grows to contain the logical drive.
For logical drives, and boot or system volumes, you can extend the volume only into contiguous space and only if the disk can be upgraded to a dynamic disk. For other volumes, you can extend the volume into non-contiguous space, but you will be prompted to convert the disk to dynamic.
Extending a basic volume you can by Using the Windows interface or
Using a command line.
To extend a basic volume using the Windows interface
- In Disk Manager, right-click the basic volume you want to extend.
- Click Extend Volume.
- Follow the on-screen instructions.
To extend a basic volume using a command line
- Open a command prompt and type diskpart.
- At the DISKPART prompt, type list volume. Make note of the basic volume you want to extend.
- At the DISKPART prompt, type select volume <volumenumber>. This selects the basic volume volumenumber that you want to extend into contiguous, empty space on the same disk.
- At the DISKPART prompt, type extend [size=<size>]. This extends the selected volume by size in megabytes (MB).
Value Description
list volume – Displays a list of basic and dynamic volumes on all disks.
select volume – Selects the specified volume, where volumenumber is the volume number, and gives it focus. If no volume is specified, the select command lists the current volume with focus. You can specify the volume by number, drive letter, or mount point path. On a basic disk, selecting a volume also gives the corresponding partition focus.
extend – Extends the volume with focus into next contiguous unallocated space. For basic volumes, the unallocated space must be on the same disk as, and must follow (be of higher sector offset than) the partition with focus. A dynamic simple or spanned volume can be extended to any empty space on any dynamic disk. Using this command, you can extend an existing volume into newly-created space.
If the partition was previously formatted with the NTFS file system, the file system is automatically extended to occupy the larger partition. No data loss occurs. If the partition was previously formatted with any file system format other than NTFS, the command fails with no change to the partition.
size= size – The amount of space, in megabytes (MB), to add to the current partition. If you do not specify a size, the disk is extended to take up all the contiguous unallocated space.
If the disk does not contain boot or system partitions, you can extend the volume into other non-boot or non-system disks, but the disk will be converted to a dynamic disk (if it can be upgraded).
Shrink a basic volume
You can decrease the space used by primary partitions and logical drives by shrinking them into adjacent, contiguous space on the same disk. For example, if you discover that you need an additional partition but do not have additional disks, you can shrink the existing partition from the end of the volume to create new unallocated space that can then be used for a new partition. The shrink operation can be blocked by the presence of certain file types. For more information, see Additional Considerations
When you shrink a partition, any ordinary files are automatically relocated on the disk to create the new unallocated space. There is no need to reformat the disk to shrink the partition.
If the partition is a raw partition (that is, one without a file system) that contains data (such as a database file), shrinking the partition might destroy the data.
Shrinking a basic volume
– Using the Windows interface
– Using a command line
Note: You must be a member of the Backup Operators or Administrators group, at minimum, to complete these steps.
To shrink a basic volume using the Windows interface
- In Disk Manager, right-click the basic volume you want to shrink.
- Click Shrink Volume.
- Follow the on-screen instructions.
You can only shrink basic volumes that have no file system or that use the NTFS file system.
To shrink a basic volume using a command line
- Open a command prompt and type diskpart.
- At the DISKPART prompt, type list volume. Note the number of the simple volume you want to shrink.
- At the DISKPART prompt, type select volume <volumenumber>. Selects the simple volume volumenumber you want to shrink.
- At the DISKPART prompt, type shrink [desired=<desiredsize>] [minimum=<minimumsize>]. Shrinks the selected volume to desiredsize in megabytes (MB) if possible, or to minimumsize if desiredsize is too large.
Change a drive letter
If you don’t like the drive letter assigned to a disk, or if you’ve got a disk that doesn’t yet have a drive letter, you can use Disk Management to change it. If you change the drive letter of a disk where Windows or apps are installed, apps might have trouble running or finding that disk. For this reason we suggest that you don’t change the drive letter of a disk on which Windows or apps are installed.
Here’s how to change the drive letter (to instead to mount the disk in an empty folder so that it appears as just another folder, see Assign a mount point folder path to a drive).
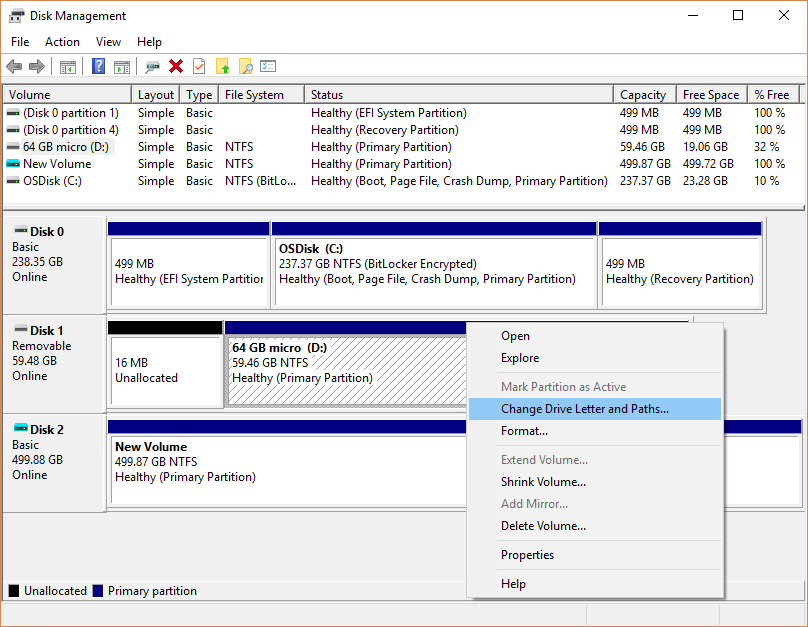
In Disk Management, right-click the disk for which you want to change or add a drive letter, and then select Change Drive Letter and Paths.
To change the drive letter, select Change. To add a drive letter if the disk doesn’t already have one, select Add.
Select the new drive letter, select OK, and then select Yes when prompted about how programs that rely on the drive letter might not run correctly.
A basic or dynamic disk’s status is Unreadable
Cause: The basic or dynamic disk is not accessible and might have experienced hardware failure, corruption, or I/O errors. The disk’s copy of the system’s disk configuration database might be corrupted. An error icon appears on disks that display the Unreadable status.
Disks might also display the Unreadable status while they are spinning up or when Disk Management is rescanning all of the disks on the system. In some cases, an unreadable disk has failed and is not recoverable. For dynamic disks, the Unreadable status usually results from corruption or I/O errors on part of the disk, rather than failure of the entire disk.
Solution: Rescan the disks or restart the computer to see if the disk status changes. Also try the troubleshooting steps described in A disk’s status is Not Initialized or the disk is missing entirely.
To open Disk Management, right-click the Start Windows Start button button and select Disk Management.
If you need help freeing up space on your PC, see Disk cleanup in Windows 10 or Free up drive space in Windows 10.
I am trying to initialize/format new Samsung 850EVO 500GB SSDs with my existing laptop via a USB/SATA cable before installing into a new build tower. Firstly, the BIOS recognizes the SSD but not Windows 10 or Windows 7. Tried to initialize the SSDs using both Windows 7 and Windows 10, but Disk Manager only recognizes the SSD after I reboot the laptop. I right-click on Initialize Disk of the Unknown Disk 1 in the Disk Manager and after about 30 seconds of time, I get the message “The Device is Not Ready.” I’ve tried different SSDs with the same result. Any suggestions on how to initialize and format the SSDs?